
 What You'll Need
4" Glass Ball Ornament
Paper
Ink Pen
White Paint Pen Marker, preferably Sharpie
Instructions:
1. Take the top off of your ornament. With some gentle tugging, the metal part will come out.

Wasn't that easy peezy? (That's what my daughter says, "Easy peezy".)
If you haven't done so already, prepare your paint pen by shaking it and depressing the point against a scrap piece of paper until the paint comes through easily.


 The Lesson of the "Time Capsule Ornament":

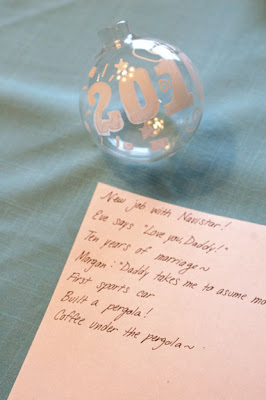
3. Now if you want to make a time capsule of the year 2010, "paint" your ornament with the paint pen to show your End-of-the-Year spirit. I drew a huge "2010" on the ornament and put some blingy stars on it, etc.
4. Using your pen, write out special things that happened this year onto your paper. You'll want to keep the writing on an area of the paper no bigger than 1/2" x 4" or so because the papers will go inside the glass ball.

I had fun writing some of our memories of the year. Laughing... as you can see I chose to show you our materialistic memories of the year. Niiiiice. Anyhooooo...

4. Gently put the scraps of paper into the glass ball and arrange them (as much as you can) so you can read some of the writing.

5. When you replace the cap, it will look like this. Voila! You just made a time capsule ornament! You can easily do this craft with children as well. It would be beautiful to have a series of these from each year... to see their little handwritten notes.
 The Lesson of the "Time Capsule Ornament":
It's easy to run around at the end of the year and forget the marvelous things that have happened. The sad things are easy to remember, aren't they? They seem to come first to mind.
This Time Capsule Ornament reminds us that the days turn into years and to treat each day as the gift that it is.
