Friday, December 31, 2010

Happy New Year 2011 Craft

Print these puppies out on card stock, string them up and VOILA! You have New Year's Garland!

A blessed new year to you all!

(If your printer margins are over 1/2 inch, you may have to select "print to size" so the circles are not cut off.)

Happy1 Copy

Happy2 Copy

Happy3 Copy

Tuesday, December 21, 2010

Tea Time

Prepare your heart to be melted, folks.
This is too cute for words. And I'm not a cute-sie person.


"Would you like some tea, Bear?"


"Heck ya," said the bear.


"She must really love me," thought the bear, "because she gave me a REAL cookie."


"Here's some more tea, Mr. Bear."


(Mommy photographer has been spotted.)


Eve is so nurturing.


And yes, she DID take back the cookie she gave her bear.

That's my girl.

Monday, December 20, 2010

Eve, Now Two

When I first started doing Christmas Crafty Days, I told myself that it could only happen if I didn't stress over it.

Instead of posting a craft today, I'm posting pics of my newly-turned 2-year-old daughter, Eve. She is just full of spunk.


She has the funniest expressions. She's not afraid to be real.
"Not too sure about this, Mom."


She loves to discover.


And if she loves basketball as much as we think, we're in trouble.
Because we don't know how to play.


She's very nurturing already.


And totally cool.


She loves her bath time, esp. with Daddy blowing bubbles in her bath.


And she's more fun than a gazillion crafts, as if that needed to be said.

We love you baby girl.

Mommy (and Daddy)

Friday, December 17, 2010

Craft 12: Time Capsule Ornament

What You'll Need

4" Glass Ball Ornament
Paper
Ink Pen
White Paint Pen Marker, preferably Sharpie


Instructions:

1. Take the top off of your ornament. With some gentle tugging, the metal part will come out.


Wasn't that easy peezy? (That's what my daughter says, "Easy peezy".)

If you haven't done so already, prepare your paint pen by shaking it and depressing the point against a scrap piece of paper until the paint comes through easily.


3. Now if you want to make a time capsule of the year 2010, "paint" your ornament with the paint pen to show your End-of-the-Year spirit. I drew a huge "2010" on the ornament and put some blingy stars on it, etc.

4. Using your pen, write out special things that happened this year onto your paper. You'll want to keep the writing on an area of the paper no bigger than 1/2" x 4" or so because the papers will go inside the glass ball.


I had fun writing some of our memories of the year. Laughing... as you can see I chose to show you our materialistic memories of the year. Niiiiice. Anyhooooo...


4. Gently put the scraps of paper into the glass ball and arrange them (as much as you can) so you can read some of the writing.


5. When you replace the cap, it will look like this. Voila! You just made a time capsule ornament! You can easily do this craft with children as well. It would be beautiful to have a series of these from each year... to see their little handwritten notes.

The Lesson of the "Time Capsule Ornament":

It's easy to run around at the end of the year and forget the marvelous things that have happened. The sad things are easy to remember, aren't they? They seem to come first to mind.

This Time Capsule Ornament reminds us that the days turn into years and to treat each day as the gift that it is.

Thursday, December 16, 2010

Craft 11: Glass Ball Ornament, Version Two

What You'll Need

4" glass ball ornaments, available at craft stores
Decorative stickers
"Filler"


Instructions:

1. We're going to start this craft just like Version One.
Set your glass ball on a cup so that you can easily apply the stickers onto it.


Morgan liked the "nature" theme.


2. Prepare your "Filler". In this case, we want to put sprigs of fake evergreen into our glass ball ornament. We'll cut the pieces to fit inside the ball.


This is something that little hands can do if they do it with care. If you've hepped up your kiddo on sugar before this craft, you may want to have him step aside so you can do the stuffing. Just a thought.


We chose a "Nature" theme, but you could easily stuff the ornament with other things:
Straw
Some glitter
Candies... Ooo, maybe not. Visions of kids trying to crack the ball...


Tomorrow we will have another craft with the glass ball ornament. Just wait. :)

The Lesson of the "Glass Ball Ornament":

The Glass Ball Ornament represents each person's life. God brings beauty to each person by placing His unique fingerprint on the way He made us, inside and out.

2 Corinthians 4:7 "...We ourselves are like fragile clay jars containing this great treasure. This makes it clear that our great power is from God, not from ourselves."

Tuesday, December 14, 2010

Craft 11: Glass Ball Ornament, Version One

What You'll Need

4" glass ball ornaments, available at craft stores
Etching cream
Old paintbrush
Disposable or protective gloves
Puffy stickers or regular stickers with some heft to them


See these stickers? It doesn't matter that they're glittery. It matters that they are about 1/8" thick, so that I can pull them off when I'm done etching.

Disclaimer: Etching cream is not good for skin (or eyes, or digestion, etc.) so wear proper protection. Due to these constraints, your child can help you by putting the stickers on the ball. They should not help with the etching cream process.

Instructions:

1. Set your glass ball on a cup so that you can easily apply the stickers onto it.


2. Arrange your stickers decoratively onto the ball. Wherever you put your stickers is where clear glass will show through.


3. Now I wish I could have shown me applying the etching cream to this ball, but I was elbow deep in gloves and had no photographer. Here's the scoop: Take an old small paintbrush and glob etching cream onto the ball.

Glob it, I tell ya. Glob it.

Let it hang for about 10 minutes. Etching is a bit of trial and error, so don't despair. The first one I did wasn't etched enough, so I increased the time to 10 minutes the next time I did it.


4. Rinse off the etching cream with water. The stickers will rinse off, too. Gentle, now. See how beautiful it is?


The lesson will appear in tomorrow's post after Version Two is explained.

Craft 11: Make Your Own Dang Craft

I hope you're laughing, because I meant it in jest.

This morning, I awoke to a Mac with serious issues. Serious.

So I used this morning to just be.

Best Christmas present ever.

Take a day for yourself and marvel at the beauty of sunshine, the funny antics of children, the silly sayings of a spouse or the realization that no matter what you do... big or small... you are important.

Blessings,

Emily

Sunday, December 12, 2010

Craft 10: Mistletoe Ball

What You'll Need

3.5" styrofoam ball
Mottled green felt, about 1/4 yard x 36"
White 1/4" diameter "berries"
Paperclip
Ribbon
Hot glue gun and glue
Scissors
Template (Follows)

I love when I'm about to do a photo shoot and I realize that my wee ones have poked holes in my last styrofoam ball. I'm keeping it real, folks:

Instructions:

1. Download the template. You'll want to cut about 10 mistletoe branches and roughly 40 quarter sized circles.

2. Hot glue one circle at the very bottom of your styrofoam ornament. Overlap about 6 pieces in a circle AROUND that first circle. Glue ANOTHER layer of the circle felt pieces over the first layer of circles. Your ornament will begin to look like an artichoke.


3. After these first three layers of circles, glue 2-3 of the mistletoe branch pieces on the next layer where you would normally put the circles. It will look funny at first, but it will make sense later.

See?

4. Continue to glue an occasional mistletoe branch with a layer of circles.


5. Before you get to the tippy top, jam a paperclip where the exact top will be and put hot glue around it to keep it in place. This is where you'll loop your ribbon in order to hang your mistletoe.


6. Prepare about 10-12 white beads for the mistletoe. These will represent the mistletoe berries.


7. Hot glue the beads onto an occasional mistletoe leaf.


8. Slip a ribbon into the paperclip and VOILA! You have mistletoe. Pucker up because whoever sees this will want to do some smooching.

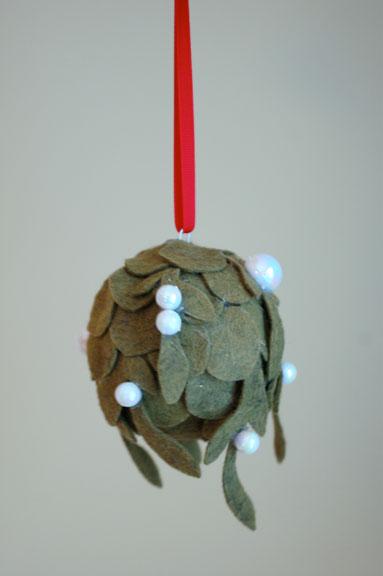
The Lesson of the "Mistletoe Ball":

The mistletoe plant is a parasite; this means that it can only grow onto the life of another-- it cannot grow unless it attaches itself to a tree or another plant form.

The mistletoe plant symbolizes how we must abide in God if we want to thrive and grow and love.

It is a symbol of eternal love.

Saturday, December 11, 2010

WINNER!

Wow! What great names! I could hardly choose between them. After some deliberation, I'd like everyone to meet Florence the Mannequin.


Which makes the winner of this week's contest: Michelle.

Congratulations, Michelle, and thank you for your kind entry:

"michelle said...

"Florence, Finally!" because finally someone is creative with fine vintage cloth. :) love it, can't wait to see all of your creations. --Michelle Nielsen"

Please contact me at cookiecutterhouse at gmail dot com to provide me with your address for your potholder. :)

Thanks to all who participated.

Thursday, December 9, 2010

Craft 9: In OTHER Words...


What You'll Need

A zest for words
Stock paper
Fine point marker
Glitter
Scissors
Old paintbrush
Glue
Wonder Under™ Fusible Web
Fabric Scraps... about 5" x 5" per ornament
Template (At bottom of page)

Instructions:

1. Download the template or make your OWN "In OTHER Words" template. Print template onto stock paper.

(Essentially these are portions of the biblical Christmas story with one word removed. Your child will help you replace this word with his/her OWN word.)


2. Here's the part that is the most fun: Ask your kiddo another word for, say, "joy"... My Morgan came up with "YIPPEE" and proudly wrote it on the card which was missing the word for joy.


3. Okay, now that THAT is done, rough-cut your circles out of the stock paper. I mean REALLY keep it rough because you'll cut it finer later and you want some margin on the edges so you can cut it well. We're about to use some wonderful material called "Wonder Under".


4. Cut a scrap of fabric large enough so it will cover the back of your circle. Do the same with your Wonder Under Fusible Web. Put the web side of your Wonder Under piece so it meets the underside of your fabric. Iron it for about 10 seconds until it seems to have really fused with the fabric.


5. Gently peel off the paper of your Wonder Under. The paper should come off without sticking to the Wonder Under. If it sticks, stop what you're doing and re-iron.


6. Now take your rough-cut ornament shape...


... and iron the web side of the Wonder Under fabric to the BACK side of your ornament. If you haven't guessed by now, we are putting a decorative fabric backing on the ornament.


7. NOW you can fine cut your ornament. Eeek! Exciting!


Keep cute and cudly babies far away from this craft. They appear innocent but they are not.


Can you guess what we'll do next?


8. Hole punch where you want your ribbon to hang.


9. Take an old paintbrush and brush glue on the outside edges. Then pour glitter of your choice on the glued part to bling it out.


Ain't it perdy? Make a half dozen and call it a day. :)


The Lesson of "In OTHER Words"

Jesus doesn't want us to come to him with many words, just our OWN words.

Matthew 6:7 And when you pray, do not keep on babbling like pagans, for they think they will be heard because of their many words.