Tuesday, February 23, 2010

Chalkboard Plates, Continued

Four chalkboard plates.

I can't even begin to tell you how excited I am about these plates. At one point I thought, "Oh man, I'm gonna end up throwing these away, I just know it."

But then, they came together. And in a moment of joy I wrote:


My Morgan found me out and wanted to help. She thought that I didn't decorate the plate enough... the one that said her name.


So I let her have at it:

Would you believe that even a ONE YEAR OLD wanted to try?
(No, she didn't do the swirly things or write her name... she just poked at it with chalk. I still think she's a genius.)

I didn't have the heart to redo it because I love her little touches.


Did I tell you where I'm planning on putting these puppies?
Because if I didn't, I'm not gonna... not yet.

Stay tuned because I have a sweet little giveaway.

Note:
Like any painted wall surface, wiping the chalk off these plates should not be done with scrubbing. Use a dry cloth or a lightly wet one. They're still glazed plates, after all. But with the two coats of primer and two coats of matte paint, methinks these plates will have a long life at Cookie Cutter House.

Chalkboard Plates

The idea was not entirely mine-- The idea to take ceramic plates and paint them with chalkboard paint-- nope, not my idea.

To be honest, I saw this idea in Pott*ery Barn's spring catalog.
They looked so fun.

The idea might be due to a surge of frugality in my budget.

Or it might be that Lowe's Home Improvement store "challenged" me by offering basic matte paint to be used as chalkboard paint. IN ANY COLOR YOU WANT.

Here are some very pretty plates I bought *for no good reason whatsoever* at an outlet.
I found them in my dining room. Just sitting there.
"Oh, I have a plan for you, my dearies..."

(Side note: Did I tell you that I'm trying to decorate my house using what I already have before I go buy more? It's kind of fun!)


I needed to make a template roughly the size of the inside of the plate...


See?
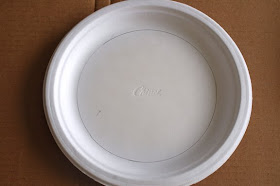

And then I cut it out.


Please keep in mind that I have no idea what I'm doing. Purely trial and error.
I taped the back of the Chinette plate...


...so it would stick nicely to my ceramic plate.


And then I taped the heck out of the edges with painter's tape.


Have you ever used spray primer? Because it is dreamy.

It is also smelly, so use it in an area that has ventilation and no people.


I put two coats on the plates.
One coat, dry. Second coat, dry.


And then the paint fumes probably got to me because I took this random picture of my dining room.


Here's the color I selected at Lowe's...
It reminded me of the old blue slate boards that teachers used.
The paint MUST be matte if it will work with chalk.


I did most of this work when Eve was sleeping or bound to her high chair.


After the primer was dried I pulled up the tape and paper plate templates.
Voila! A funny edge! (Grrrrr.)


Steel wool-like sponges save the day and clean the edges.


With a paintbrush I carefully, carefully painted over the primer. Twice.

And if you want to know if it works well, then you'll just have to wait until tomorrow, my friend.

This project probably took 2 hours tops.
It's very choppy as far as time increments... a bit of waiting.

Cost: If you have some plates already, then the cost is $10 for paint, $5 for a small paintbrush, $5 for painter's tape and $5 for primer. But if you're crafty, you may already have most of that stuff.

I hesitate to answer this one. Obviously the painting parts require some precision and some ventilation, so leave the youngins out of that part. But the taping part could be fun for older children.

Not really that hard. And kinda fun.

Sunday, February 21, 2010

The Little Kitchen That Could

My first house was a small, two-bedroom bungalow that had something in spades that this house does not: storage. I find this most ironic because bigger is supposed to mean "more" as far as storing stuff, or so I thought.

My kitchen has been a source of woe for me since we moved into this house almost 3 years ago. The SIZE of the kitchen is wonderful.
And I love the flow.
But the storage in the cabinets is not conducive to anything that is smaller than a sheet pan.

I've coveted a new kitchen. I've barked at my cabinets to work for me. But in the end, the Great Budget Talk of 2010 lead my husband and me to believe that a car for my hubs is more necessary than a new kitchen.

*Serenity*

So, I've taken to doing a few updates of my own to make this kitchen work for me.

This is the peninsula in my kitchen.


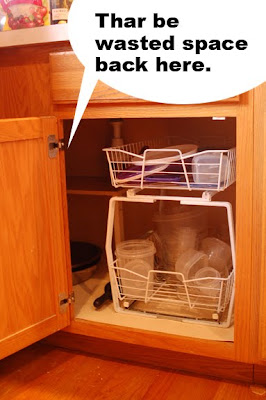
And this is a close-up of the far left cabinet. I've precariously towered multiple bowls and all manner of glassware in this far back space. Finally I gave up and just installed this wire rack. I put my "leftovers" containers in these two racks and I LOVE the space they provide. The space BEYOND the racks are relatively empty, but I've made my peace with that.

Because my kitchen is so low on usable storage space, I use another closet as my make-do kitchen closet for now.


I use the modular track systems so I can adjust my shelves to whatever height I want.
And I keep the unbreakable things on the bottom because...


... I have a curious little Eve.


My spices were often MIA until I bought some storage solutions.
Here is one of my spice racks:

And here is another one. I've placed the spices in alphabetical-ish order because the hubs and I kept losing spices (or so we thought) and we kept buying more.


Lands, I love this pull out trash can. Made my Simple Human.


None of my drawers fit my foil and plastic wrap and such.
I love this door-mounted model.


These solutions aren't always pretty, but they keep my kitchen functioning and keep me' Irish anger from flaring up--make me smile for the time being.

Saturday, February 20, 2010

Why We Tag Team When Remodeling

Dear Me Oh My ... This child is pure energy. Her name means "Life" and boy does she live up to it. Believe it or not, this kid loves to see the world upside down. This may not bode well for her future.


She'll read books to herself.
But that's only to distract me.
When I turn my back, she eats them.


She likes to use a spoon.


But sometimes it just t'aint fast enough for her.
I hope she continues this on her first date. *Delightful*


To the untrained eye, this may look like Eve is puckering up.
She does this face when she doesn't want you to wipe her face or, ESPECIALLY, her nose.


She'll always be my "bald" baby, but for the record, she does have hair.

Friday, February 19, 2010

You Sew, Girl

My dear Morgan,

Lately you have been secretly swiping little bits of ribbon from my sewing box. You've shredded fabric with your love of cutting. And you've been taking thread to needle any chance you can get. It was time that I bought you your first sewing equipment.

You had no idea what was in the box.

And you didn't have to say a word because your expression said it all.

You examined your new scissors and needles and measuring tape. And you were MOST proud of receiving a seam ripper because "only big girls would get something like this."

In no time at all you began to embroider. I didn't teach you a thing. I let you discover it for yourself. In all honestly, I expected some wild stitches.

I didn't expect these perfect little pink ones.

And I certainly didn't expect you to make a "G"... for "Grandma"...

This is just the beginning, my dear, of many happy creative sewing moments. May you enjoy them all.

Love, Mom

Wednesday, February 17, 2010

Mudroom Floor

Several weeks ago, we did not have a mudroom.

The room that is now our mudroom was a galley laundry room. It attracted mud, but it was not a mudroom. We moved the laundry room upstairs in an oversized closet and, by jove, it made space for "Le Room de Mud." (Doesn't that sound lovelier in french?)

Now color me crazy, but when the winter-esque months outnumber the summerish ones in your state, there should be a mudroom built into your house. There just should.

But that's history. Here is our "before" mudroom floor installation:

And here is baby girl getting all covetous about tools. *So proud.*


Before installing the floor, the hubs took out the quarter round at the base of the moulding. When he's done tiling, he'll reinstall it. He looks a tad too happy for the chore ahead of him-- he has to use some gentleness to keep the quarter round moulding from breaking. We have to reuse it, after all.


He then drilled some backerboard onto the vinyl. We didn't rip the vinyl up.
After that, the hubs made a plan for how the tiles would look on the floor. This helped him from having awkward cuts in tile around tough corners. (Isn't he smart?)


We decided on a rough slate for the flooring because it was budget friendly and good for getting dirty. Slate, being a natural stone, has variances in color. Dan made sure he mixed up the colors so it would have a cohesive look.


He worked in the garage. I have no idea how he endured the cold. But he's from Iowa.


(Mixing mortar and giving me that "Are you finished?" look.)


It took two days to lay the tile. The bulk of the work was prep work, he tells me. Those white things are cross-shaped spacers. They help keep an even distance between tiles.


Pinch me. The mudroom is actually coming to be...


On day three, Dan put took the spacers out from between the tiles and applied grout.
Next, we'll apply a sealer for the grout and reinstall the moulding.

Baby Eve did a little jig on the new floor. This kid loves to dance.


This job took us about 3 days. The actual prep work and laying of tile took roughly 10 hours. There is a necessity to leave time for mortar and grout to set for 24 hours each. Because of the large time commitment, we scheduled a weekend which included a holiday.

We used our own labor, so the cost was purely supplies. We spent roughly $200, the bulk of which was the cost of slate. We were thrilled that Home De*pot sells this bulk slate for about $1.60 a square foot. Bargain!

This project was definitely not "Child Friendly". In fact, a few days after we set the tile, our toddler ate some grout nuggets she found. A call to Poison Control informed us that WET grout can burn a youngster but DRY grout is relatively safe. Not healthy, mind you, but not terribly harmful.

The difficulty in this project lay in the time commitment, the messiness of the project and the relative "child unfriendliness" of it. All in all, however, my husband says he enjoys laying tile. He'll also say that his body is sore. (We appreciate your work, Dan!)

And then...

The next steps in the mudroom are the built-in bench and the built-in shelving unit.